
When a security incident strikes, the analysts who respond fastest are almost always the ones working from a Linux terminal. No GUI overhead, no waiting for tools to load -- just raw, scriptable power at your fingertips. Whether you are investigating a compromised server, hunting for indicators of compromise (IOCs) across terabytes of logs, or performing memory forensics on a suspected rootkit, Linux gives you the flexibility and depth that no other platform can match.
This guide walks you through the essential Linux skills every cyber threat analyst needs, from foundational text-processing commands to advanced forensics techniques. Every section includes real commands you can practice immediately. This guide covers the Linux commands, tools, and workflows analysts use for log analysis, file system and process forensics, network traffic analysis, memory forensics, and automated threat hunting.
1. Why Linux Dominates Cybersecurity
Linux is not just another operating system for security professionals -- it is the operating system. According to SANS Institute surveys, approximately 78% of incident response teams rely on Linux as their primary analysis platform. There are several fundamental reasons for this dominance.
The "everything is a file" philosophy means that network sockets, hardware devices, process information, and kernel parameters are all accessible as files. This unified interface lets you inspect a running process's memory maps the same way you read a log file -- with standard text-processing tools.
Specialized security distributions put hundreds of pre-configured tools at your disposal. REMnux is purpose-built for malware analysis with tools like Volatility, YARA, and radare2 pre-installed. SIFT Workstation from SANS provides a complete forensic environment with timeline tools, file carvers, and evidence management utilities. Kali Linux bundles penetration testing and offensive security tools alongside defensive analysis capabilities.
Beyond the tools, Linux gives you transparency. Open-source means you can audit every component of your analysis environment, verify tool behavior, and ensure your forensic platform has not been tampered with -- a guarantee no closed-source OS can offer.
2. The Power Trio: grep, awk, sed
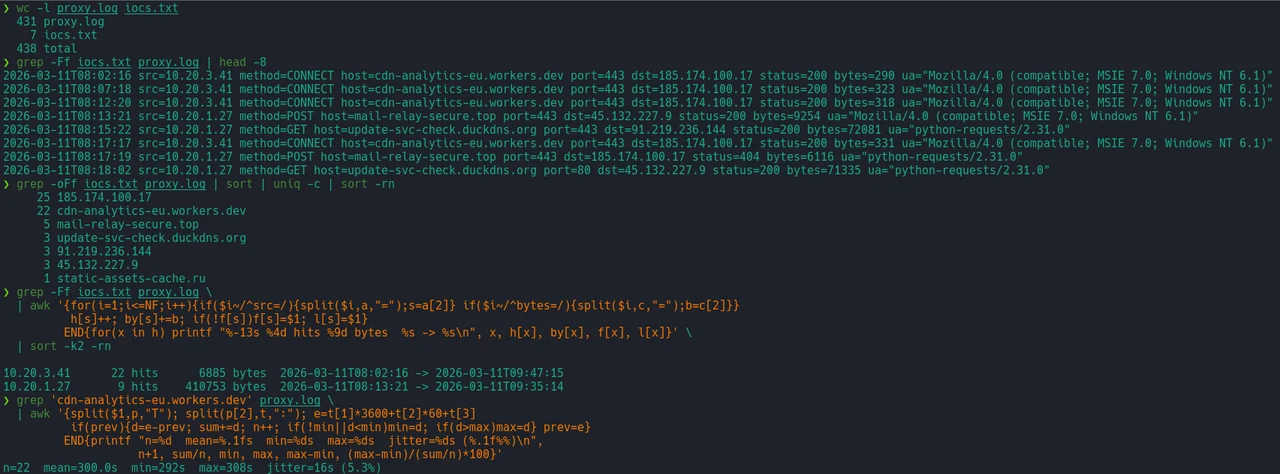
These three commands form the backbone of text processing in Linux. Mastering them transforms you from someone who reads logs into someone who interrogates them.
grep: Pattern Searching
The grep command searches files for patterns and is your first line of investigation when hunting for IOCs. Use extended regex with -E for complex patterns and -i for case-insensitive searches.
# Search for known malicious IPs across all logs
grep -rn "192.168.1.107\|10.0.0.55" /var/log/

# Extract all IP addresses from a log file
grep -oE "\b([0-9]{1,3}\.){3}[0-9]{1,3}\b" /var/log/syslog

# Find domain IOCs with context (3 lines before and after)
grep -C 3 -i "malware-c2\.evil\.com" /var/log/dns.log

# Recursive search for base64-encoded payloads in web directories
grep -rl "eval(base64_decode" /var/www/html/

# Hunt for suspicious user-agent strings in web logs
grep -iE "(sqlmap|nikto|dirbuster|gobuster)" /var/log/apache2/access.log
awk: Field Extraction and Analysis
awk excels at structured data processing. It splits each line into fields, making it perfect for analyzing columnar log formats like Apache access logs or CSV threat feeds.
# Extract source IPs and count connection frequency
awk '{print $1}' /var/log/apache2/access.log | sort | uniq -c | sort -rn | head -20

# Find requests returning 4xx/5xx errors with timestamps
awk '$9 ~ /^[45]/ {print $4, $1, $7, $9}' /var/log/apache2/access.log

# Calculate total bytes transferred per IP
awk '{bytes[$1] += $10} END {for (ip in bytes) print bytes[ip], ip}' access.log | sort -rn

# Identify the top 10 attacking IPs from auth failures
awk '/Failed password/ {print $(NF-3)}' /var/log/auth.log | sort | uniq -c | sort -rn | head -10
sed: Text Transformation
sed is a stream editor that transforms text on the fly. In security contexts, it is invaluable for anonymizing sensitive data, extracting IOCs, and reformatting logs for ingestion into SIEMs.
# Anonymize IP addresses in logs before sharing
sed -E 's/([0-9]{1,3}\.){3}[0-9]{1,3}/[REDACTED_IP]/g' incident.log > sanitized.log

# Extract URLs from a log file
sed -n 's/.*\(https\?:\/\/[^ ]*\).*/\1/p' proxy.log

# Convert Windows-style paths to Linux in IOC lists
sed 's/\\/\//g' windows_iocs.txt

# Remove comment lines and blank lines from config files
sed '/^#/d; /^$/d' /etc/suspicious.conf
3. Combining Tools with Pipe Chains
The real power of Linux emerges when you chain commands together with pipes. A single one-liner can replace entire commercial tools for specific analysis tasks.
SSH Brute-Force Detection
# Detect SSH brute-force: find IPs with more than 5 failed logins
grep "Failed password" /var/log/auth.log \
  | awk '{print $(NF-3)}' \
  | sort | uniq -c | sort -rn \
  | awk '$1 > 5 {print $0}'
Web Application Attack Detection
# Find SQL injection attempts in web logs
grep -iE "(union.*select|or\s+1=1|drop\s+table|;--)" /var/log/apache2/access.log \
  | awk '{print $1, $7}' \
  | sort -u

# Detect directory traversal attempts
grep -E "\.\./\.\." /var/log/nginx/access.log \
  | awk '{print $1}' | sort | uniq -c | sort -rn
Real-Time Threat Monitoring
# Monitor auth log in real-time, alerting on failures
tail -f /var/log/auth.log | grep --line-buffered "Failed" \
  | awk '{print strftime("%H:%M:%S"), "ALERT:", $0}'
4. Linux Log Analysis
Log files are the foundation of incident investigation. Linux provides powerful tools for searching, filtering, and correlating log data across multiple sources.
journalctl: Modern Log Filtering
# View authentication events from the last 24 hours
journalctl -u sshd --since "24 hours ago" --no-pager

# Filter by priority (0=emergency to 7=debug)
journalctl -p err --since "2026-04-01" --until "2026-04-08"

# Follow logs in real-time for a specific service
journalctl -u nginx -f

# Export logs in JSON format for SIEM ingestion
journalctl --since today -o json > /tmp/today_logs.json
Brute-Force Investigation Case Study
Consider a scenario: your SIEM alerts on unusual SSH activity. Here is a structured investigation workflow using only command-line tools.
# Step 1: Scope the attack -- how many failed attempts?
grep -c "Failed password" /var/log/auth.log

# Step 2: Timeline -- when did the attack start and stop?
grep "Failed password" /var/log/auth.log | head -1 && grep "Failed password" /var/log/auth.log | tail -1

# Step 3: Identify attacker IPs and attempt counts
grep "Failed password" /var/log/auth.log \
  | awk '{print $(NF-3)}' | sort | uniq -c | sort -rn | head -10

# Step 4: Check if any attempt succeeded
grep "Accepted password" /var/log/auth.log \
  | awk '{print $(NF-3)}' > accepted_ips.txt
grep "Failed password" /var/log/auth.log \
  | awk '{print $(NF-3)}' | sort -u > failed_ips.txt
comm -12 <(sort accepted_ips.txt) <(sort failed_ips.txt)

# Step 5: Check which usernames were targeted
grep "Failed password" /var/log/auth.log \
  | awk '{print $(NF-5)}' | sort | uniq -c | sort -rn | head -10
5. File System Forensics
When investigating a compromised system, the file system holds critical evidence. Attackers leave traces -- hidden files, modified timestamps, planted executables -- and Linux gives you the tools to find them all.
# Find hidden files and directories (common attacker tactic)
find / -name ".*" -type f -not -path "/proc/*" -not -path "/sys/*" 2>/dev/null

# MACB timestamp analysis: find files modified in the last 24 hours
find / -mtime -1 -type f -not -path "/proc/*" -not -path "/sys/*" 2>/dev/null

# Find files with unusual permissions (SUID/SGID -- privilege escalation)
find / -perm -4000 -type f 2>/dev/null

# Detect recently installed suspicious executables
find /tmp /var/tmp /dev/shm -type f -executable 2>/dev/null

# File integrity check using SHA-256
sha256sum /usr/bin/ssh /usr/bin/sudo /usr/bin/ps > baseline_hashes.txt
# Later, verify integrity:
sha256sum -c baseline_hashes.txt

# Identify files with mismatched extensions (e.g., ELF binary named .jpg)
find /var/www -type f -name "*.jpg" -exec file {} \; | grep -v "JPEG\|image"
Key Takeaway
Always check /tmp, /var/tmp, and /dev/shm during investigations. These world-writable directories are frequently used by attackers to stage tools and malware because they require no special permissions to write to.
6. Process Analysis
A compromised system often runs malicious processes disguised as legitimate services. Linux exposes every detail of running processes through the /proc filesystem and a suite of diagnostic commands.
# Full process tree -- spot orphaned or suspicious child processes
pstree -pa

# Detailed process listing with full command lines
ps auxww | grep -v "\[" | sort -k3 -rn | head -20

# Inspect a suspicious process via /proc
ls -la /proc//exe      # Symlink to the actual binary
cat /proc//cmdline     # Full command line
cat /proc//environ     # Environment variables
ls -la /proc//fd       # Open file descriptors
cat /proc//maps        # Memory mappings

# Find processes with deleted binaries (classic malware indicator)
ls -la /proc/*/exe 2>/dev/null | grep "(deleted)"

# Network connections per process
ss -tulnp | sort -k5

# Find processes listening on unusual ports
lsof -i -P -n | grep LISTEN | awk '{print $1, $3, $9}'

# Identify processes making outbound connections
lsof -i -P -n | grep ESTABLISHED | awk '{print $1, $3, $9}'
The /proc filesystem is a goldmine during live forensics. Each process directory contains everything from memory maps to file descriptors to network connections. Pay special attention to processes whose /proc/PID/exe symlink points to a deleted file -- this is a strong indicator that an attacker has launched malware and then deleted the binary from disk to avoid detection.
7. Network Traffic Analysis
Network traffic analysis lets you observe attacker communications in real-time or reconstruct them from packet captures. Linux provides a complete toolkit from raw packet capture to protocol-level analysis.
tcpdump: Packet Capture and Filtering
# Capture traffic on all interfaces, write to file
tcpdump -i any -w /tmp/capture.pcap

# Filter for DNS traffic (port 53) -- useful for C2 detection
tcpdump -i eth0 port 53 -nn

# Capture only SYN packets (detect port scanning)
tcpdump -i eth0 'tcp[tcpflags] == tcp-syn' -nn

# Monitor traffic to a specific suspicious IP
tcpdump -i any host 203.0.113.66 -nn -v

# Capture HTTP traffic and display ASCII content
tcpdump -i eth0 port 80 -A | grep -E "(GET|POST|Host:)"
tshark: Protocol-Level Analysis
# Extract HTTP requests from a pcap file
tshark -r capture.pcap -Y "http.request" -T fields -e ip.src -e http.host -e http.request.uri

# Analyze DNS queries -- identify beaconing or tunneling
tshark -r capture.pcap -Y "dns.qr==0" -T fields -e ip.src -e dns.qry.name \
  | sort | uniq -c | sort -rn | head -20

# Extract TLS certificate information (identify C2 domains)
tshark -r capture.pcap -Y "tls.handshake.type==11" -T fields -e ip.dst -e tls.handshake.certificate
Zeek for C2 Detection
# Process a pcap with Zeek
zeek -r capture.pcap

# Analyze connection logs for long-duration sessions (beaconing)
awk '$9 > 3600 {print $3, $5, $9}' conn.log | sort -k3 -rn

# Identify DNS tunneling by query length
awk '{if (length($10) > 50) print $10}' dns.log | sort | uniq -c | sort -rn
8. Memory Forensics
Memory forensics is critical for detecting fileless malware, rootkits, and injected code that leaves no trace on disk, and is a core part of the process NIST SP 800-86 describes for integrating forensics into incident response. Linux provides multiple tools for acquiring and analyzing volatile memory.
Memory Acquisition
# Using LiME (Linux Memory Extractor) kernel module
sudo insmod lime.ko "path=/tmp/memory.lime format=lime"

# Using AVML (Acquire Volatile Memory for Linux) -- no kernel module needed
sudo avml /tmp/memory.raw
Volatility Framework Analysis
# Identify the Linux profile
vol.py -f memory.lime --info | grep Linux

# List all processes (detect hidden processes)
vol.py -f memory.lime --profile=LinuxUbuntu2204x64 linux_pslist

# Compare process list with psaux to find hidden processes
vol.py -f memory.lime --profile=LinuxUbuntu2204x64 linux_psxview

# Dump process memory for malware analysis
vol.py -f memory.lime --profile=LinuxUbuntu2204x64 linux_dump_map -p  -D /tmp/dumps/

# Check for loaded kernel modules (rootkit detection)
vol.py -f memory.lime --profile=LinuxUbuntu2204x64 linux_lsmod

# Detect hooked system calls
vol.py -f memory.lime --profile=LinuxUbuntu2204x64 linux_check_syscall

# Extract network connections from memory
vol.py -f memory.lime --profile=LinuxUbuntu2204x64 linux_netscan
9. Persistence and Rootkit Detection
Attackers establish persistence to survive reboots and maintain access. Linux offers numerous persistence mechanisms, and you need to check each one during an investigation.
# Check all cron jobs for all users
for user in $(cut -f1 -d: /etc/passwd); do
    crontab -l -u "$user" 2>/dev/null | grep -v "^#" && echo "--- $user ---"
done
ls -la /etc/cron.d/ /etc/cron.daily/ /etc/cron.hourly/

# Inspect systemd services for suspicious entries
systemctl list-unit-files --type=service | grep enabled
# Look for services in unusual paths
find /etc/systemd /usr/lib/systemd -name "*.service" -newer /etc/os-release

# Check for unauthorized SSH keys
find / -name "authorized_keys" -type f 2>/dev/null -exec echo "=== {} ===" \; -exec cat {} \;

# Detect LD_PRELOAD hijacking (library injection)
cat /etc/ld.so.preload 2>/dev/null
env | grep LD_PRELOAD
grep -r "LD_PRELOAD" /etc/profile.d/ /etc/environment /etc/bash.bashrc 2>/dev/null

# Check for eBPF-based threats
bpftool prog list 2>/dev/null
# Look for unexpected eBPF programs attached to network interfaces
bpftool net list 2>/dev/null

# Detect modified system binaries
rpm -Va 2>/dev/null || dpkg --verify 2>/dev/null

# Check for suspicious shell initialization files
cat /etc/profile /etc/bash.bashrc ~/.bashrc ~/.bash_profile 2>/dev/null | grep -E "(curl|wget|nc |ncat|/dev/tcp)"
Pay close attention to LD_PRELOAD hijacking: attackers can intercept any library call by preloading a malicious shared object. This technique is used by advanced rootkits to hide files, processes, and network connections from standard tools. Similarly, eBPF-based threats represent an emerging attack surface where malicious programs run in kernel space, making them extremely difficult to detect with traditional tools.
10. Automating with Bash
Manual threat hunting does not scale. Bash scripting lets you automate repetitive security checks, schedule regular scans, and build alerting systems that notify you the moment something suspicious appears.
Threat Hunting Script
#!/bin/bash
# threat_hunt.sh - Automated threat hunting checks
REPORT="/tmp/threat_hunt_$(date +%Y%m%d_%H%M%S).txt"

echo "=== Threat Hunt Report $(date) ===" > "$REPORT"

# Check for processes with deleted binaries
echo -e "\n[*] Processes with deleted binaries:" >> "$REPORT"
ls -la /proc/*/exe 2>/dev/null | grep "(deleted)" >> "$REPORT"

# Check for unauthorized SUID binaries
echo -e "\n[*] SUID binaries:" >> "$REPORT"
find / -perm -4000 -type f 2>/dev/null >> "$REPORT"

# Check for new listening ports
echo -e "\n[*] Listening ports:" >> "$REPORT"
ss -tulnp >> "$REPORT"

# Check recent failed SSH logins
echo -e "\n[*] Top failed SSH sources (last 24h):" >> "$REPORT"
journalctl -u sshd --since "24 hours ago" --no-pager 2>/dev/null \
  | grep "Failed" | awk '{print $(NF-3)}' \
  | sort | uniq -c | sort -rn | head -10 >> "$REPORT"

# Check for suspicious cron entries
echo -e "\n[*] All cron jobs:" >> "$REPORT"
for user in $(cut -f1 -d: /etc/passwd); do
    crontab -l -u "$user" 2>/dev/null && echo "-- $user --"
done >> "$REPORT"

echo -e "\n[*] Report saved to $REPORT"
Scheduling Security Checks
# Schedule the threat hunt script to run every 6 hours
echo "0 */6 * * * /opt/scripts/threat_hunt.sh" | crontab -

# Set up real-time alerting for critical auth events
tail -F /var/log/auth.log | while read line; do
    if echo "$line" | grep -qE "(BREAK-IN|ROOT LOGIN|Failed password.*root)"; then
        echo "$line" | mail -s "SECURITY ALERT" [email protected]
    fi
done &
IOC Scanner Script
#!/bin/bash
# ioc_scanner.sh - Scan system for known IOCs
IOC_FILE="/opt/threat_intel/iocs.txt"
LOG_DIRS="/var/log /tmp /var/tmp /home"

echo "[*] IOC scan started at $(date)"

while IFS= read -r ioc; do
    [[ "$ioc" =~ ^#.*$ || -z "$ioc" ]] && continue
    results=$(grep -rl "$ioc" $LOG_DIRS 2>/dev/null)
    if [ -n "$results" ]; then
        echo "[!] MATCH: $ioc found in:"
        echo "$results" | sed 's/^/    /'
    fi
done < "$IOC_FILE"

echo "[*] IOC scan completed at $(date)"
The command line is the great equalizer in cybersecurity. With Linux and a terminal, a skilled analyst with open-source tools can match or exceed the capabilities of analysts relying on expensive commercial platforms.
Frequently Asked Questions
Why do security analysts prefer Linux over Windows for investigations?
Linux gives analysts direct, scriptable access to logs, processes, and the file system through a unified "everything is a file" model, without GUI overhead. Its open-source nature also means the analysis environment itself can be audited and verified.
What are grep, awk, and sed used for in security work?
grep searches files for patterns (like known malicious IPs), awk extracts and analyzes structured fields in logs, and sed transforms text on the fly, such as anonymizing IP addresses before sharing a log with a third party.
What should I check first when investigating a compromised Linux system?
Common first steps include reviewing recently modified files, checking for processes with deleted binaries, inspecting cron jobs and systemd services for persistence, and reviewing authentication logs for brute-force or unauthorized access attempts.
What is LD_PRELOAD hijacking?
LD_PRELOAD hijacking is a technique where an attacker preloads a malicious shared library to intercept library calls, letting rootkits hide files, processes, or network connections from standard investigative tools.
Why acquire memory before disk forensics?
Memory is volatile. It holds evidence of running processes, active network connections, and decrypted data that disappears the moment a system is powered off or rebooted, so memory should always be captured first.
Key Takeaway
Always acquire memory before performing any disk forensics. Memory is volatile and contains evidence of running processes, network connections, and decrypted data that will be lost once the system is powered off or rebooted.